Chromebooks are known for their speed and efficiency, but even the best machines can slow down over time. One of the main culprits is the cache, a temporary storage area that helps speed up web browsing and other tasks. However, if the cache becomes too large or corrupted, it can actually slow down your Chromebook’s performance. In this article, we’ll explain what Chromebook cache is, when and why you should clear it, and how to do it step-by-step.
What Is Chromebook Cache?
A cache is a type of memory that stores data temporarily so that it can be accessed quickly. For example, when you visit a website, your Chromebook stores certain elements of that site in its cache, such as images, scripts, and other files. This allows the site to load more quickly the next time you visit it. The same goes for other apps and files on your Chromebook – they all have their own caches that store temporary data.
While the cache can help speed up your Chromebook, it can also slow it down if it becomes too large or corrupted. Over time, your cache can accumulate a lot of unnecessary data, such as old versions of websites and apps that you no longer use. This can take up valuable space on your Chromebook’s storage and cause it to run slower than usual. Clearing your cache regularly can help free up space and improve your Chromebook’s performance.
When Should I clear the Chromebook cache?
There are several situations where it’s a good idea to clear your Chromebook cache. Here are some of the most common:
- Your Chromebook is running slow or lagging
- Websites and apps are taking longer than usual to load
- You’re experiencing issues with certain websites or apps
- You’re running low on storage space
If you’re experiencing any of these issues, clearing your cache can help. It’s also a good idea to clear your cache periodically, even if you’re not experiencing any issues. This can help keep your Chromebook running smoothly and prevent any potential performance issues down the line.
Step-by-step guide: How to clear cache on a Chromebook
Clearing your Chromebook cache is a simple process that can be done in just a few steps. Here’s how to do it:
Clearing app-specific cache on a Chromebook
- Open the app that you want to clear the cache for.
- Click on the three dots in the top-right corner of the screen.
- Select “Settings” from the drop-down menu.
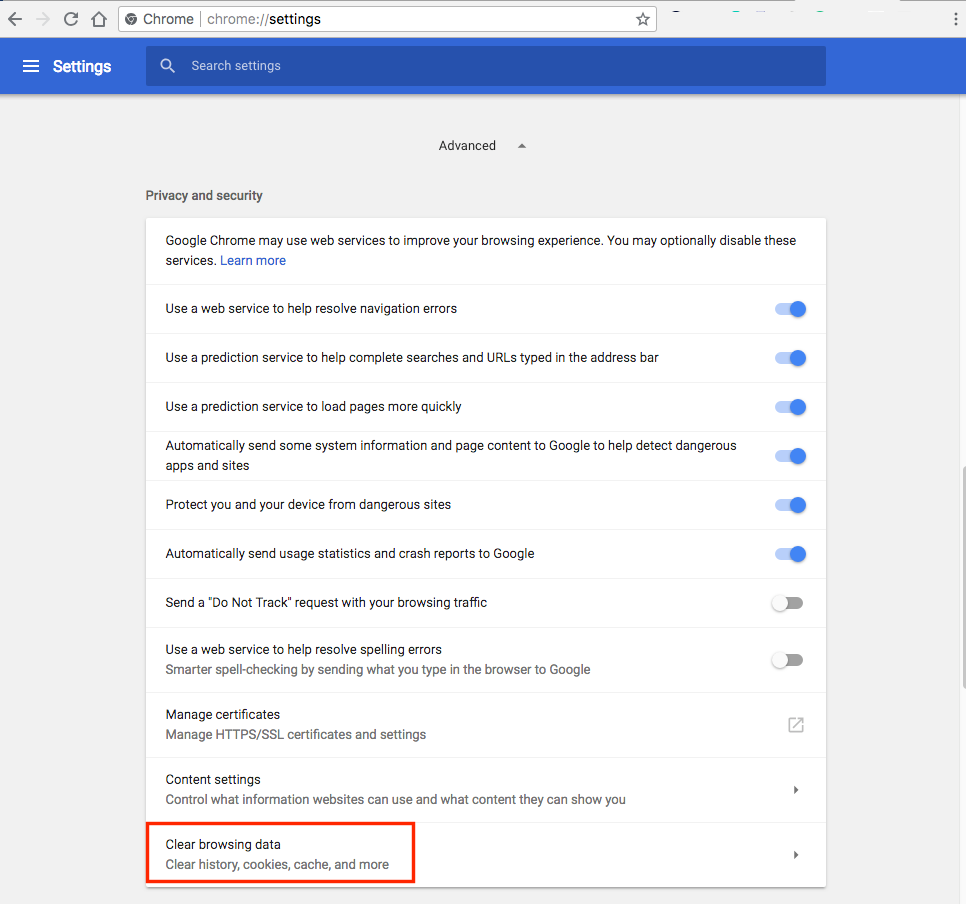
- Scroll down to the “Privacy and Security” section and click on “Clear browsing data.”
- Make sure the “Cached images and files” option is checked.
- Select the time range you want to clear (e.g. “Last 7 days” or “All time”).
- Click “Clear data” to clear the app-specific cache.
Clearing browser cache on a Chromebook
- Open the Chrome browser.
- Click on the three dots in the top-right corner of the screen.
- Select “Settings” from the drop-down menu.
- Scroll down to the “Privacy and Security” section and click on “Clear browsing data.”
- Make sure the “Cached images and files” option is checked.
- Select the time range you want to clear (e.g. “Last 7 days” or “All time”).
- Click “Clear data” to clear the browser cache.
Clearing system cache on a Chromebook
- Turn off your Chromebook.
- Hold down the “esc” and “refresh” buttons on your keyboard.
- While holding down these buttons, press the power button to turn on your Chromebook.
- Release the “ESC” and “refresh” buttons when you see the “Chrome OS is missing or damaged” screen.
- Press “Ctrl + D” to enter developer mode.
- Press “Enter” to confirm that you want to enter developer mode.
- Wait for your Chromebook to restart.
- Press “Ctrl + Alt + T” to open the terminal.
- Type “sudo sh” and press “Enter.”
- Type “sudo sync” and press “Enter.”
- Type “sudo echo 3 > /proc/sys/vm/drop_caches” and press “Enter.”
- Wait for the cache to clear, then restart your Chromebook.
Best practices for maintaining a clear cache on your Chromebook
Clearing your cache regularly is important, but there are also some best practices you can follow to help maintain a clear cache on your Chromebook:
- Use a browser extension or app to clear your cache automatically
- Limit the number of tabs and windows you have open at once
- Uninstall apps and extensions you no longer use
- Keep your Chromebook updated with the latest software and security patches
- Use cloud storage services to store files and free up local storage space
By following these best practices, you can help prevent your cache from becoming too large or corrupted in the first place.
Troubleshooting common cache-clearing issues
Clearing your cache is usually a straightforward process, but there are some common issues that can arise. Here are some troubleshooting tips to help you if you’re having trouble clearing your cache:
- Make sure you’re using the correct method for clearing the cache for the app or browser you’re using
- Try restarting your Chromebook before clearing the cache
- Disable any extensions or add-ons that may be interfering with the cache-clearing process
- If you’re still having issues, try clearing your cache in safe mode
Additional tips for improving Chromebook performance
Clearing your cache is just one way to improve your Chromebook’s performance. Here are some additional tips to help you get the most out of your machine:
- Use the “Guest browsing” feature to reduce clutter and improve performance
- Disable unnecessary apps and extensions
- Adjust your Chromebook’s power settings to conserve battery life
- Use a lightweight browser like Firefox or Opera
- Consider upgrading your Chromebook’s hardware (e.g. RAM or storage) if it’s compatible
By following these tips, you can ensure that your Chromebook is running at peak performance.
Conclusion
Clearing your Chromebook cache is a simple yet effective way to improve your machine’s performance. By understanding what cache is, when to clear it, and how to do it step-by-step, you can keep your Chromebook running smoothly and efficiently. Remember to follow best practices for maintaining a clear cache, troubleshoot any issues that arise, and consider other ways to improve your Chromebook’s performance. With these tips in mind, you can make the most of your Chromebook and enjoy fast, reliable computing.